Pages

Mommy Corner: Puzzle Solution


Merry Christmas, the holidays are in full swing and the dust has settled on our present unwrapping adventures.  I have a quick little mommy post for you. 
This is a cute little puzzle that Santa brought to my house for Christmas.  Wouldn’t you know it, there were no pictures under the pieces and the nearly 2 year old was a bit frustrated by the lack of direction when putting the pieces where they belong.

 
No worries, mommy had a quick fix and he was back to puzzle playing in under 15 minutes.  I placed the pieces on the HP All-In-One and ran a quick color copy.
 
I then cut the copies out and used Modge Podge to glue them into the blank spaces.  Once secure I gave them another coat of glue on top and dried the completed puzzle with my blow dryer. 


See nothing major, a quick fix that made my littlest one very happy. 
 
I hope you all enjoyed your Christmas, and may you have a Happy and Safe New Year.

Pirate Room Done: I Don't Have To Walk The Plank

You know I was thinking if this blog was a teenager it would be on a shrink’s couch right now complaining about how neglected it is, and how I don’t pay it any attention.  Good for me it is an inanimate object that comes from my own little brain otherwise I would be in big trouble. 

The entire month of August got away from me before I realized it. I have been crazy busy with life, work, a last minute vacation, and the start of a new school year.  I know that a lot of moms were fired up about school starting, but for me it just means homework in the evenings.  Okay I confess, I purchased the summer bridge activity workbooks, but the atmosphere for those is quite a bit more relaxed than homework.  Any who…on with today’s post.   

The “Pirate Bedroom” is finally finished.  Well, finished in the sense that my part is complete.  I am sure things will be added, subtracted or just generally tweaked by the kindergartner as his taste and interest change.  So without further ado her you go. 

 
A few things have been added since the last update, I made some books ledges, and my sister put a few decorative pillows on the floor to create and reading area for him to lounge around and read. The side table painted and topped in this post.


Some items were placed on shelf I installed previously, a few more treasures that he picked out.

The art holding octopus and some metal palm trees. He was kind enough to provide me with some of his favorite art from this summer. 


I added an upcycled toy box on which I painted some treasure chest artwork.  I don’t think I will be quitting my day job to become a trompe l'oeil painter, but he loved it.  There is the chalk board fashioned from a mirror frame found here.

I added a mirror that I purchased from the ReStore.  It was green of all things, and I painted it the same white I used to whitewash the night stand and book ledges. 


Last but not least, my favorite, a lamp that I purchased at the Good Will and refinished.  I searched high and low for this one and the thrift store gods shined down on me one Saturday afternoon.  I so wanted to keep this one but alas I have no nautical themed room in which to put it. 


I could have kept going with, silk palm trees, sea shell curtain tie backs…and on and on.  But I put my hands up and backed away from the kid’s room.  I needed to quit while I was ahead and remember that kid friendly was what I was going for, not the cover of BHG.  Insert a chuckle here.

So there you have it finally.  My nephew was so excited with each new item that I put in; he couldn’t wait for me to finish up so he could hang out in his cool room.  Come back soon, I will be showing you all the major happenings in the front yard. 

What Has Eight Legs & Holds Art?

Why an octopus of course! I know I haven’t shown y’all this pirate bedroom I’m always going on about, but the fact of the matter is I'm not quite finished with it.  Any normal person would be done by now, but the truth is I keep thinking of other things that would go well in there and I want to wait until it's all done.  It is so close to being finished.   
I got to thinking that my nephew needed a place to hang his art work and there are so many wonderful ideas out there, however I came up with this idea out of my own crafty little brain.  Mostly because I needed an excuse to play with my new overhead projector that I purchased off of craigslist, also because I wanted something to take up plenty of space on those red walls.

I began by finding a silhouette of an octopus on line and tracing is onto a transparency. 
I turned a half sheet of bead board paneling to the wrong side and traced the silhouette using my handy dandy overhead projector.  
Next I drilled several holes at different places on the board to accommodate the sharp angles. A skill saw can't make those sharp turns and drilling the pilot holes at the onset kept me from stopping during the cutting.
I cut out the octopus with a skill saw and sanded the edges with a detail sander. 


I painted the octopus with a blue sample I picked up at the Lowes’s that I watered down to achieve a more transparent wash than a solid paint job.  I dry brushed over the blue paint with a bit of off white. 

Lastly I used small screws to attach silver bulldog clips.  I had to use a split washer to keep the screws from coming out the back, plus it keeps the clips from spinning. 


I had to search the store room for the smallest screwdriver I could find, so it would fit through the clip itself.  Luckily I had one on hand.  I secured one clip for each of the legs and I was done. 


Major cuteness I think and I can’t wait to show you guys how it looks on the wall. 


Come back for the last pirate room project and the big reveal.  I promise it is almost finished, and if I’m lying y’all can make me walk the plank. 

UPDATE: Here is the finished product up in the finished room, what fun this was. 


Fence Fixing Time


Hey Howdy everybody.  I am posting a quick fence fix today to keep the puppy dog from running the roads.  I talked about the critter here in this post, but we needed some additional fence fixes and this time a little more attractive and usable. 
The little powerhouse peeking out from the ferns in this picture is Harry.  He is a rescue dog that we adopted a couple of years ago, and he is quite athletic.  He has the ability to leap small fences in a single bound. 

Months back we built a fence to fit the riding mower in the back yard, detailed here.  Real carpenters might want to turn away because this is about to get ugly.  I had a problem with the slope of the grade and water runoff and at the end of a long day of gate building I cut the bottom with a reciprocating saw.  I know, I know not exactly the right way to do it, but I stand by my decision as a DIYer.  It was late, I was tired and losing the light so I did it.  Needless to say we had an ugly gap in the bottom of the gate that we filled in with a random 2x4 and a few bricks. 

The problem is Harry is steadfast in his quest for freedom to chase buses, garbage trucks and unleashed dogs. So here is the engineering that was born out of my DIY brain. 

First I purchased and fence board and cut it the width of the gate. 

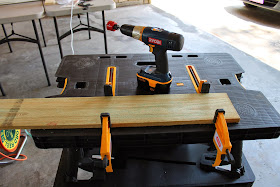
Next I clamped it down to my work table and used and hole saw to cut a few drainage holes along the bottom. 

Then I marked where the board would meet the fence boards behind it and sketch out a track. I drilled pilot holes and used the skill saw to cut tracks on both sides. 

Once they were sanded and somewhat smooth, I assembled the dog catcher on the gate.  I drilled holes through the existing fence boards. 
 
I attached my contraption in a bolt-washer-board-board-washer-wingnut fashion. 

The idea being that I could loosen the wingnut and slide the board up, then tighten to hold in place while I open and close the gate. 

 
I took the picture after I was finished, two weeks worth of weather have yellowed the board to the same hue as the others and the fix seems as though it belongs there.  Maybe one day I will re-grade the yard on this side of the house but for now this works beautifully at keeping Harry in, and others out.
 
It works a like a charm, and I have used it several times with no problem.  I take turns cutting the grass with the yard man and he told me he saw the new board, but asked me why I cut the slits in the boards? He had an AHA moment when I explained it was so he could move the board up and down without removing it.   So there it is my critter catcher for the front of the house. 

Out Dang Spot: Acrylic Paint Run Amok


Alright y’all, in preparation for all the messes we get into to, I am sharing a laundry tip that I came across on over the weekend.  As usual there’s a backstory.  I was skimming my Facebook page and came across a BOGO special at the local Painting With A Twist, and asked a few girlfriends who was up for painting with me.  Turned out that everyone was busy because it was a weeknight, and I got in my head to pitch the idea to my hubs.  You could have blown me over with a feather when he said yes.  He had no idea what we were getting into, but he liked the idea of a date night and a new experience.  Yay!
So we called in a baby sitter and armed with a thermos full of Bloody Mary (we’re not big wine drinkers) we were off on an adventure.  The painting was a two part picture that was supposed to come together in the center.  Long story short we had a blast. 


Fast forward two weeks when I grabbed my cute gray knit jacket off the back of a kitchen chair and headed out the door, only to notice while out on my errand that I had dark blue paint on my elbow.  Aaah man?!?  A few weeks later I returned to paint a picture with my son and asked the instructor if she knew of a good way to get acrylic paint out of clothing, she very quickly answered none at all. 
I was cruising the internet asking the same question several different ways and stumbled on a woman who said she was able to get it out acrylic paint with alcohol, and 409.  Now I don’t buy a lot of different cleaners, but 409 is a staple under my sink. So I thought I would give it a try, I really had nothing to lose. 

I placed a piece of wax paper and paper towels in the sleeve and poured alcohol on the stain, then I sprayed the 409 and began to scrape off the dried on paint with my fingernail.  This worked great, it took most of the paint off.  I sprayed and dabbed at the stain with a paper towel on the top, then removed and replaced the paper towel on the inside.  Check out how well the paint went through to the other side. 

When I was done only faint traces of the paint remained.  I put it in the washer with some other items and gave it a whirl. 

Now for the star of this post…check out the washer/dryer combo. 
I talked about the great deal I got on these and how much I adore them in this post.  Last year some time the hubs and I built the riser from this Ana White plan, and there has been no more bending.  I didn’t even need to sand and distress the paint job because normal wear and tear has done that for me.  I have given some thought to painting and decorating in here, but my hubby and nephew may disown me if I make them lift the washer and dryer again.

I will say this, if you are going to raise the washer/dryer splurge on one of these. It is called a laundry butler, and worth every penny. I love how convenient it is for loading and unloading.  I once ripped the rubber boot that seals the door of the washer with a blue jean button and sadly replacing it is not a DIY job, or cheap.   So now I am very gentle when loading and unloading the washer. 


This cart comes with a hanging bar, but it wasn’t really needed seeing as how I have a bar from wall to wall, and it kept banging into the door.  I removed the bar and used the end cap where I had removed the piece. 

Back to the jacket, I removed it from the washer and decided the spot was still too dark for my liking.  I wanted to treat it once more before letting it dry.  So I repeated the process a second time and gave it another washing. 
In the end there is the slightest stain remaining, but I am the only one who really can see it. 

The fabric is heather gray, which varies enough in color that it is not noticeable to anyone not looking for it. 

I was glad to save my cute gray jacket from weekend warrior wear pile.  Thank you random lady from the internet, you saved my jacket.