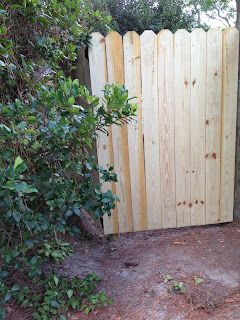
Today I am posting a quick fix for the back yard to make a new fence critter proof, mixed in with a couple Tool Talk tips. Being a corner lot has its advantages to be sure, extra square footage and only one fence neighbor to name a couple. However you often end up home to the block's utility needs. Case in point: There is a pad mounted transformer in the back corner of my yard. For many years it was surrounded by a makeshift fence that consisted of some chain link precariously placed against the wooden fence separating me and my neighbor. Several months ago I was contacted by the electric company who informed me they had been working on the transformer and wanted permission to take out the make shift chain link and build me a wooden gate to give them easier access. Well again, I’m no fool I immediately said yes and gave them my blessing. When I returned home that day I had a shiny new fence/gate that not only hid the transformer but gave me more privacy.
Now there was the trouble of Harry. Harry is a sweet little Dachshund we adopted from the Feliciana Animal Welfare Society. He is named after one of my son’s favorite books Harry the Dirty Dog, but in reality it’s more like Harry Houdini.
For starters he can spring a good 4 feet
into the air, he has been known to clear the wall separating the carport from the back
yard, and has used every bit of patio furniture I own to facilitate his escapes. The gap left at the bottom of my fence was
simply not going to work for us.
I grabbed
some wire mesh I had on hand, an oscillating tool, gloves, tape measure, staple
gun, and a couple extension cords.
I began by measuring the length of both sides of the gate. Here’s a handy tip, if you need to take a few
measurements for a quick project like this one, use a piece of painters tape to
write down the numbers on your measuring tape.
I laid out the mesh and clipped it to my table to hold it still. While cutting my second piece I burn up my
oscillating tool and ended up cutting the remaining mesh with utility
scissors. It wasn't easy, but it worked. I need to invest in some tin snips.
With the two pieces cut to
length I hauled the needed tools to the back corner to get started. I wanted to mention how much I use the extension reel below. It brings the outlet closer to me so that I don't need to link 200 feet of extension cord. It is so handy for large power tools and long expanses like this project.
I began by cutting away some of the brush
with a pair of B&D Alligator Loppers I bought off the clearance rack at Lowe’s. I don’t mind buying things out of the box to
get the better price.
Also you can see the Velcro straps I keep on the end of my cords to secure the plugs and keep
them from coming apart while I am working.
I then stapled the wire mesh to the bottom of the gate using my power
stapler. I went back with a hammer to
tap in any staples that weren’t flush and checked for any puppy sized gaps.
That’s all there was to it. I have said before that I want to share the truth and nothing but, so I will admit that the plan was to cut the second piece on an angle to account for the change in grade, but I was in a hurry to finish this project before I had to picks up the boys and stapled it on upside down. Arrgh!?!
That’s all there was to it. I have said before that I want to share the truth and nothing but, so I will admit that the plan was to cut the second piece on an angle to account for the change in grade, but I was in a hurry to finish this project before I had to picks up the boys and stapled it on upside down. Arrgh!?!
But in the long run it worked so I
figured when I put a new flower bed back here and plant a tree no one will
notice. Another project tackled, bring
on the next.


No comments:
Post a Comment
If you have trouble commenting on this blog, please be sure to like the Marta On a Mission page on Facebook. Comments are always welcome. Thank you for visiting and come back soon.
https://www.facebook.com/martaonamission