Showing posts with label Marta Marcase. Show all posts

Everything's Coming Up Crawfish: Adventures In Wreath Making


Today I am sharing a deco-mesh wreath I made for my sister.  I love to drive by homes and see the beautiful door wreaths, but for me personally it’s not my cup of tea.  Why would someone who has a knack for crafts not have a wreath for every occasion you ask? STORAGE!  Not that I don’t have plenty of storage, but the thought of climbing the attic stairs every 6 weeks to celebrate the next holiday that has been immortalized in wreath form just sounds exhausting. Don’t get me wrong I have some Easter, Fall and definitely Christmas boxes, but I almost never take them all out and display the many wonders tucked away up there.
So why am I going on about this, well I wanted to try my hand at a deco-mesh wreath and the opportunity presented itself in the form of a crawfish boil.  My beautiful sister celebrated a monumental birthday with a crawfish boil and I knew the time had come to give this craft a try. 

I went in search of inspiration and crafts supplies and came up with a ton of options.  I went from store to store searching out the combination of items I was sure she would like being careful not to go overboard with my theme, and being mindful of the budget.  A $15 bag of faux lemons would have done the trick, but I searched for the three lemons I found at the Dollar Tree. That's my little helper hand checking out mommy's supplies.


I began by watching tutorials on YouTube and was confident I had a good idea of what it was I needed to do.  I added pipe cleaners to my wreath form and began to load the wreath like the videos showed.  


The inner ring went well but I discovered that the outer rings needed extra pipe cleaners to achieve the same fullness I achieved on the inner ring. No biggie I gave myself a do-over and got the look I was hoping for.

Then came the bow and finally the stuff. I found a checked wired burlap ribbon and I like the drape of the extra mesh at the end so I left it hanging.  Then I cut an extra length to match the drape and wired it on so they matched. 

I found a fabulous item in the floral section of Hobby Lobby that looked like chicken wire, but was made of floral wire.  I wasn’t quite sure how I was going to use it, but I knew I had to have it.  I ended up cutting pieces and fashioning miniature crawfish traps. 

And that cute bottle of Tony Chachere's came from my kitchen. It was the right size so I was happy to recycle it into a craft project. 


I placed the other items around the wreath to determine the spacing and when I was satisfied with the spacing I gave them all a healthy glob of hot glue and made it permanent. 

Her party was in March and to date the crawfish have proven too heavy for the hot glue, they will have to be wired in place but the rest is holding up nicely on her front door.
This one was such a big hit I was asked to make others.  So while my door is still pretty plain, others in my family have beautiful wreaths.  I will show you the Spring wreath my mother requested soon.

Crawfish Boil Corn Grits: Now That's Spicey


It is a new week and what better way to celebrate than with good food.  This is sort of a follow up to the previous crawfish boil post where I made yummy potato salad.  Another recipe I whipped up Easter Sunday was yellow corn grits using the left over crawfish boil corn. 

So without further ado, I present Crawfish Boil Corn Grits.  Here’s what you’ll need. 
2 cups water or chicken stock
2 cups heavy cream
1 cup yellow corn grits
4 tbsp. butter
Salt & pepper to taste
1 cup of corn kernels (previously boiled)
½ cup sliced green onions


I purchased my corn at a local seafood market blocks from my house.  They are crazy busy this time of year and 3 ears of corn will set you back $1.49.  For this recipe I used 6 ears, but given that theirs was much spicier that the ones we made during our own boil next time I will only use three.
Begin by removing the kernels from the cobs with a sharp paring knife and break them up with your fingers.

Bring the water, heavy cream and butter to a boil with a good dash of salt.  When this comes to a boil I add the grits and immediately stir to keep the grits from clumping. 


Then lower the heat to medium low and simmer for 15-20 minutes.  Add the corn and green onions after about 10 minutes to give the flavors time to come together.  Serve immediately and enjoy. 

Something to think about, when I made this for Easter I used an 8 quart stock pot for the recipe and I made 1 ½ cups of grits with 3 cups each of water and heavy cream.   I prefer the texture in the larger pot and the cooking seemed to be more precise. The grits cooked more evenly and with less stirring and I was able to adjust the seasoning easier. 


Next time I make these I will use a much larger pot than the one I used here. It may even be a good excuse to buy a pot like the one in my mother’s kitchen.   There you go, Crawfish Boil Corn Grits, enjoy and remember to share with a friend.

Crawfish Boil & A Sack Of Taters


Thank goodness it is spring time! I bet you thought I dropped off the face of the earth, well good news, I’m still here.  I have adjusted my approach to the blog and decided that it doesn’t have to be perfect with long explanations and perfectly cropped and airbrushed photos my projects. This is my way of sharing my excitement for homemaking and creating and its coming to you live and in color straight from the heart, and yes, most of the time direct from my iPhone.
Today it is Crawfish Boil Potato Salad.  My beautiful sister celebrated her birthday a week before Easter and I came away with left over crawfish, potatoes and corn.  What does one do with so many leftovers? Well invent recipes of course. 


I am giving you approximate measurements here, as with any potato salad, it's a matter of taste.  Here’s what you will need.
3 lbs. of small red potatoes cooked in crawfish boil
1 large stalk of celery
2 green onions chopped
½ jar of pimentos
½ to 1 cup of mayonnaise
¼ to ½ cup of spicy brown mustard
¼ cup horseradish sauce
Splash of lemon juice
Tony Chachere’s Cajun Seasoning
Salt & Pepper

Here’s what I did. This was two gallon size freezer bags of potatoes.  I started by using my paring knife to peel mostly around the center of the potatoes.  I like a little potato peel in my salad to keep it rustic, but too much gets in the way and interferes with the flavor in my opinion.  Then I cubed them and added them to my large bowl. 

I chopped 1 large stalk of celery, 2 green onions and added those to the bowl, along with ½ a jar of pimentos, mayonnaise, spicy brown mustard, horseradish sauce and lemon juice.  I seasoned with salt, pepper and the beloved Tony Chachere’s Cajun Seasoning.  Because the potatoes had been refrigerated for a week I used a potato masher to give them a little smashing and get the texture I wanted.  I mixed this all together and put in a container overnight.

The next day I tasted the potato salad again and decided on a little extra mayo, and another hit of Tony’s.  The crawfish boil seasoning on the potatoes was enough that I didn’t have to work hard to season the salad.  The horseradish added a nice zing to it.  It just so happened that I picked up the ham for Easter at the Honey Baked store and couldn’t resist their horseradish sauce.  I know it is pricey, but it’s so good and I only buy it once a year.  You can use any jar horseradish you want to here, but if it is straight horseradish you might start out with a couple of tablespoons and add to your liking.
I used the leftover crawfish to make a few crawfish pies, and the spicy crawfish boil corn made the best yellow corn grits.  Needless to say we ate well for Easter, and thanks to my wonderful family for all their dishes and desserts that made it a wonderful holiday. So there you go Crawfish Boil Potato Salad.    Enjoy and remember to share with a friend. 

Pirate Room Done: I Don't Have To Walk The Plank

You know I was thinking if this blog was a teenager it would be on a shrink’s couch right now complaining about how neglected it is, and how I don’t pay it any attention.  Good for me it is an inanimate object that comes from my own little brain otherwise I would be in big trouble. 

The entire month of August got away from me before I realized it. I have been crazy busy with life, work, a last minute vacation, and the start of a new school year.  I know that a lot of moms were fired up about school starting, but for me it just means homework in the evenings.  Okay I confess, I purchased the summer bridge activity workbooks, but the atmosphere for those is quite a bit more relaxed than homework.  Any who…on with today’s post.   

The “Pirate Bedroom” is finally finished.  Well, finished in the sense that my part is complete.  I am sure things will be added, subtracted or just generally tweaked by the kindergartner as his taste and interest change.  So without further ado her you go. 

 
A few things have been added since the last update, I made some books ledges, and my sister put a few decorative pillows on the floor to create and reading area for him to lounge around and read. The side table painted and topped in this post.


Some items were placed on shelf I installed previously, a few more treasures that he picked out.

The art holding octopus and some metal palm trees. He was kind enough to provide me with some of his favorite art from this summer. 


I added an upcycled toy box on which I painted some treasure chest artwork.  I don’t think I will be quitting my day job to become a trompe l'oeil painter, but he loved it.  There is the chalk board fashioned from a mirror frame found here.

I added a mirror that I purchased from the ReStore.  It was green of all things, and I painted it the same white I used to whitewash the night stand and book ledges. 


Last but not least, my favorite, a lamp that I purchased at the Good Will and refinished.  I searched high and low for this one and the thrift store gods shined down on me one Saturday afternoon.  I so wanted to keep this one but alas I have no nautical themed room in which to put it. 


I could have kept going with, silk palm trees, sea shell curtain tie backs…and on and on.  But I put my hands up and backed away from the kid’s room.  I needed to quit while I was ahead and remember that kid friendly was what I was going for, not the cover of BHG.  Insert a chuckle here.

So there you have it finally.  My nephew was so excited with each new item that I put in; he couldn’t wait for me to finish up so he could hang out in his cool room.  Come back soon, I will be showing you all the major happenings in the front yard. 

What Has Eight Legs & Holds Art?

Why an octopus of course! I know I haven’t shown y’all this pirate bedroom I’m always going on about, but the fact of the matter is I'm not quite finished with it.  Any normal person would be done by now, but the truth is I keep thinking of other things that would go well in there and I want to wait until it's all done.  It is so close to being finished.   
I got to thinking that my nephew needed a place to hang his art work and there are so many wonderful ideas out there, however I came up with this idea out of my own crafty little brain.  Mostly because I needed an excuse to play with my new overhead projector that I purchased off of craigslist, also because I wanted something to take up plenty of space on those red walls.

I began by finding a silhouette of an octopus on line and tracing is onto a transparency. 
I turned a half sheet of bead board paneling to the wrong side and traced the silhouette using my handy dandy overhead projector.  
Next I drilled several holes at different places on the board to accommodate the sharp angles. A skill saw can't make those sharp turns and drilling the pilot holes at the onset kept me from stopping during the cutting.
I cut out the octopus with a skill saw and sanded the edges with a detail sander. 


I painted the octopus with a blue sample I picked up at the Lowes’s that I watered down to achieve a more transparent wash than a solid paint job.  I dry brushed over the blue paint with a bit of off white. 

Lastly I used small screws to attach silver bulldog clips.  I had to use a split washer to keep the screws from coming out the back, plus it keeps the clips from spinning. 


I had to search the store room for the smallest screwdriver I could find, so it would fit through the clip itself.  Luckily I had one on hand.  I secured one clip for each of the legs and I was done. 


Major cuteness I think and I can’t wait to show you guys how it looks on the wall. 


Come back for the last pirate room project and the big reveal.  I promise it is almost finished, and if I’m lying y’all can make me walk the plank. 

UPDATE: Here is the finished product up in the finished room, what fun this was. 


Fence Fixing Time


Hey Howdy everybody.  I am posting a quick fence fix today to keep the puppy dog from running the roads.  I talked about the critter here in this post, but we needed some additional fence fixes and this time a little more attractive and usable. 
The little powerhouse peeking out from the ferns in this picture is Harry.  He is a rescue dog that we adopted a couple of years ago, and he is quite athletic.  He has the ability to leap small fences in a single bound. 

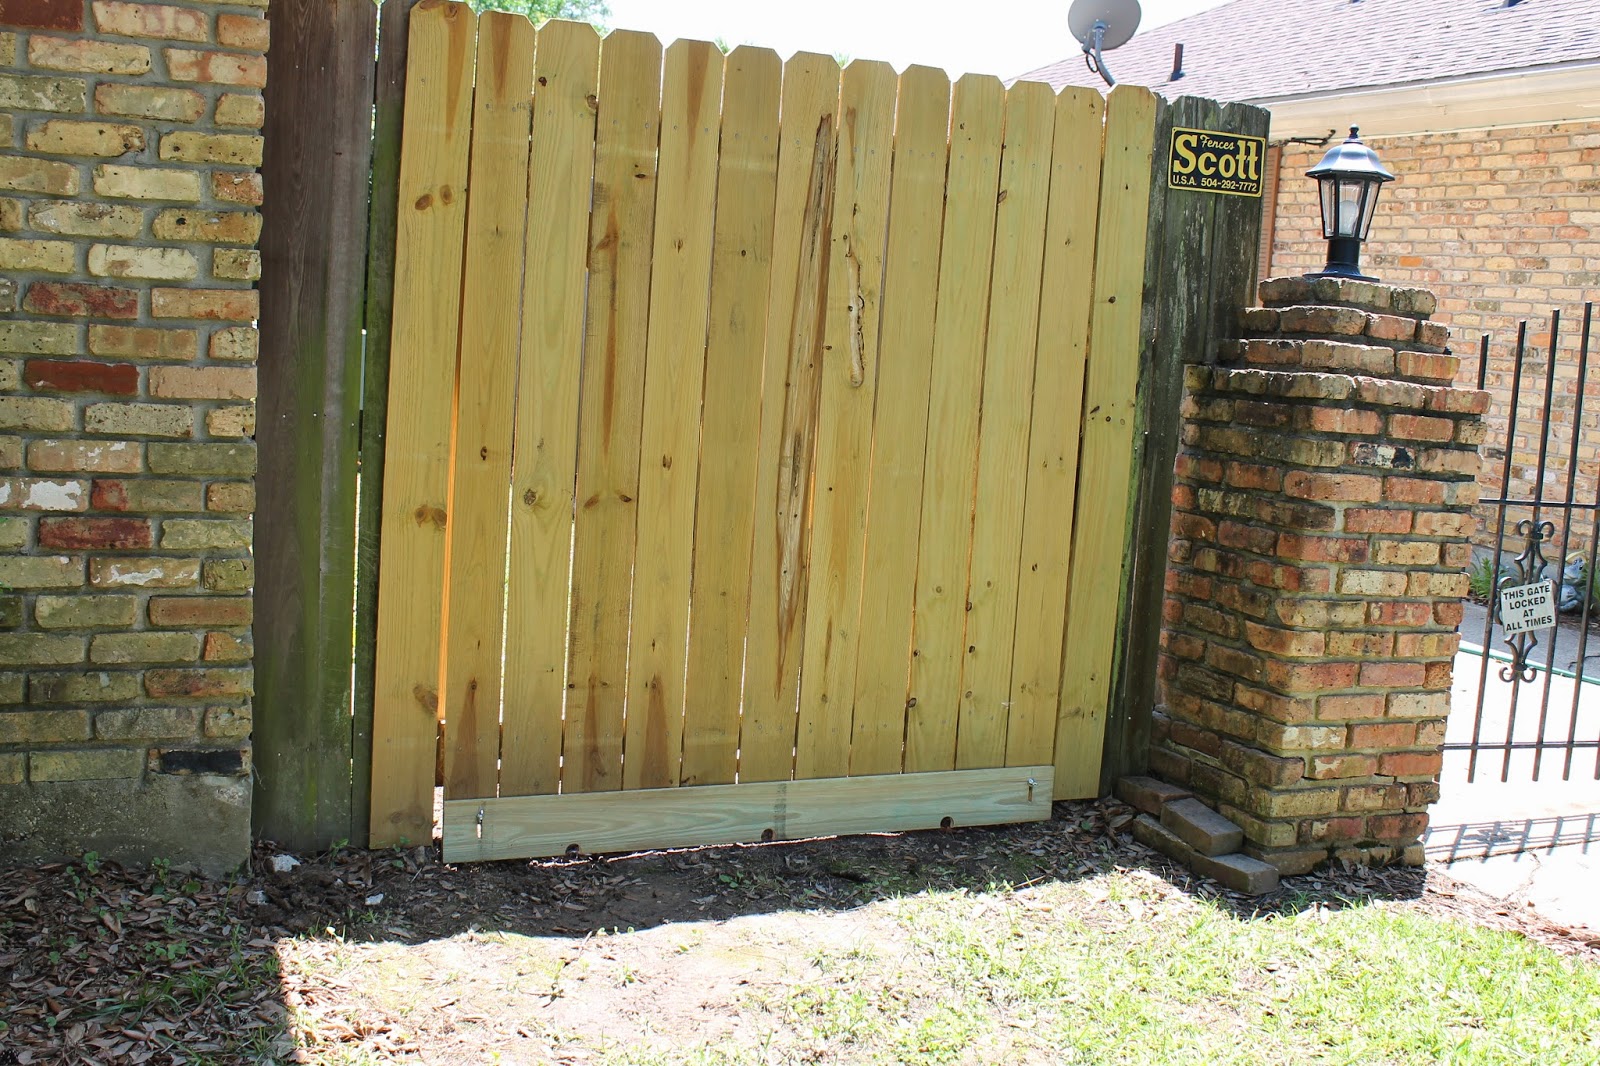
Months back we built a fence to fit the riding mower in the back yard, detailed here.  Real carpenters might want to turn away because this is about to get ugly.  I had a problem with the slope of the grade and water runoff and at the end of a long day of gate building I cut the bottom with a reciprocating saw.  I know, I know not exactly the right way to do it, but I stand by my decision as a DIYer.  It was late, I was tired and losing the light so I did it.  Needless to say we had an ugly gap in the bottom of the gate that we filled in with a random 2x4 and a few bricks. 

The problem is Harry is steadfast in his quest for freedom to chase buses, garbage trucks and unleashed dogs. So here is the engineering that was born out of my DIY brain. 

First I purchased and fence board and cut it the width of the gate. 

Next I clamped it down to my work table and used and hole saw to cut a few drainage holes along the bottom. 

Then I marked where the board would meet the fence boards behind it and sketch out a track. I drilled pilot holes and used the skill saw to cut tracks on both sides. 

Once they were sanded and somewhat smooth, I assembled the dog catcher on the gate.  I drilled holes through the existing fence boards. 
 
I attached my contraption in a bolt-washer-board-board-washer-wingnut fashion. 

The idea being that I could loosen the wingnut and slide the board up, then tighten to hold in place while I open and close the gate. 

 
I took the picture after I was finished, two weeks worth of weather have yellowed the board to the same hue as the others and the fix seems as though it belongs there.  Maybe one day I will re-grade the yard on this side of the house but for now this works beautifully at keeping Harry in, and others out.
 
It works a like a charm, and I have used it several times with no problem.  I take turns cutting the grass with the yard man and he told me he saw the new board, but asked me why I cut the slits in the boards? He had an AHA moment when I explained it was so he could move the board up and down without removing it.   So there it is my critter catcher for the front of the house.